


In this article, we are going to deep dive into how you can add a payment gateway like Razorpay into your website. Integration with Razorpay is relatively easy as compared to other payment methods, so let's jump right into it.
Tech Stack used in the article:
- React for front-end
- NodeJS for APIs
- MongoDB as Database
The first thing we'll need to do is to create a razorpay account and then go to the settings option and generate API keys for your account. Save these API keys some place safe as they won't show you again. (Note: For development purposes, click on the Test Mode in top of your screen, so we are not dealing with real money while developing and testing)
This is high level diagram that we are going to follow.
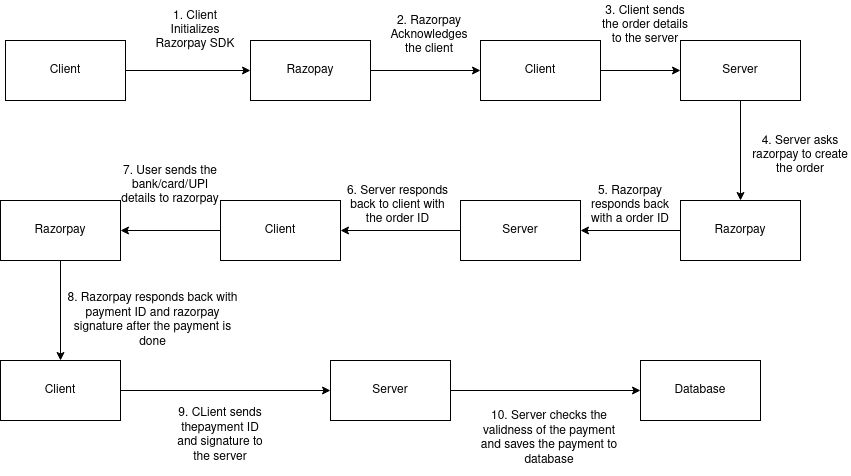
The diagram seems a little complex, but trust me, the implementation is not !
So let's write some code to implement this.
Open your jsx file of the component where you want to integrate razorpay and write the initializeRazorpay function
const initializeRazorpay = () => {
        return new Promise((resolve) => {
          const script = document.createElement("script");
          script.src = "https://checkout.razorpay.com/v1/checkout.js";

          script.onload = () => {
            resolve(true);
          };
          script.onerror = () => {
            resolve(false);
          };

          document.body.appendChild(script);
        });
    }
This is the 1st point of diagram where we initialize razorpay
Then in the same file, write the makePayment function which calls you backend API. Here I am using axios to call the backend APIs.
const makePayment = async () => {
        const res = await initializeRazorpay();

        if (!res) {
          alert("Razorpay SDK Failed to load");
          return;
        }
        // Make API call to the serverless API
        axios({
            method: 'POST',
            url: `/api/subscription/`
        })
        .then(data => {
            console.log(data);
            var options = {
                key: razorpayAccountId,
                name: "Vishal Arora",
                currency: data.currency,
                amount: data.amount,
                order_id: data.id,
                description: "1 year premium subscription",
                image: "http://vishal-arora.s3-website.ap-south-1.amazonaws.com/vishal.jpg",
                handler: async function (response) {
                    // Validate payment at server - using webhooks is a better idea.
                    // Call subscription/success api
                    axios({
                        method: 'POST',
                        url: `/api/subscription/success`,
                        data: {
                            amount: data.amount,
                            razorpayPaymentId: response.razorpay_payment_id,
                            razorpayOrderId: response.razorpay_order_id,
                            razorpaySignature: response.razorpay_signature
                        }
                    }).then(res => {
                        // Add your logic here for once the payment is done
                    }).catch(err => {
                        console.log(err)
                    })
                },
                prefill: {
                    name: 'User name',
                    email: 'User email',
                    contact: 'User contact',
                },
            }

            const paymentObject = new window.Razorpay(options);
            paymentObject.open();
        })
        .catch(err => console.log(err))
      }
In the makePayment function we first call our /api/subscription api which creates a razorpay order and sends back the orderId, which we send to razorpay along with other details like amount to window.Razorpay function. Notice how we call /api/subscription/success in the handler function. This is the function that will be called once the razorpay completes the payment.
So let's write the Code for /api/subscription and /api/subscription/success endpoints.
const shortid = require('shortid')
const Razorpay = require('razorpay')
const crypto = require('crypto')

router.post('/api/subscription/', async (req, res, next) => {
    try {
        const razorpay = new Razorpay({
            key_id: process.env.RAZORPAY_KEY_ID,
            key_secret: process.env.RAZORPAY_SECRET,
        })
        // Create an order -> generate the OrderID -> Send it to the Front-end
        const payment_capture = 1;
        const amount = 3999;
        const currency = "INR";
        const options = {
            amount: (amount * 100).toString(),
            currency,
            receipt: shortid.generate(),
            payment_capture,
        };

        const response = await razorpay.orders.create(options);
        res.status(200).json({
            id: response.id,
            currency: response.currency,
            amount: response.amount,
        });
    }  catch (error) {
        res.status(400).send(error);
    }
})
As you can see, in the /api/subscription API, we connect with razorpay with the details recieved from front end and create an instance of an order and then send those details to frontend
const shortid = require('shortid')
const Razorpay = require('razorpay')
const crypto = require('crypto')

router.post('/api/subscription/success', async (req, res, next) => {
    try {
        const {
            razorpayPaymentId,
            razorpayOrderId,
            razorpaySignature,
            amount
        } = req.body;
        const { user } = req

        // Creating our own digest
        const shasum = crypto.createHmac("sha256", process.env.RAZORPAY_SECRET);
        shasum.update(`${razorpayOrderId}|${razorpayPaymentId}`);
        const digest = shasum.digest("hex");

        // comaparing our digest with the actual signature
        if (digest !== razorpaySignature)
            return res.status(400).json({ msg: "Transaction not legit!" });

        // THE PAYMENT IS LEGIT & VERIFIED
        // Write your Business Logic here

        res.json({
            msg: "success",
            orderId: razorpayOrderId,
            paymentId: razorpayPaymentId,
            subscriptionEndDate: subscriptionEndDateResponse
        });
    }  catch (error) {
        console.log(error)
        res.status(500).send(error);
    }
})
Here in the /api/subscription/success we check the razorpay signature with signature that we created using the razorpayOrderId and razorpayPaymentId
That's it, told you the diagram was overly complex :)
Now you can call the makePayment function in your UI on a button click or however you like and you will see this screen
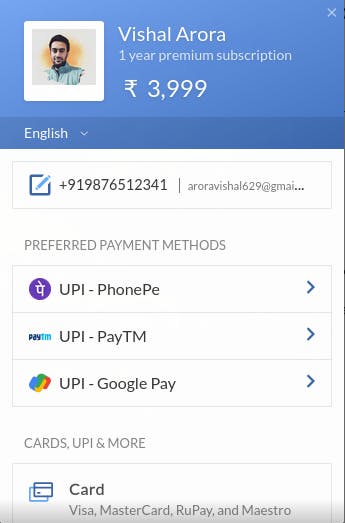
Go ahead and make you first payment :)